Pages

Jan 30, 2011

From Blah to BLING - a DIY story

I've been meaning to post this for a while now. I really enjoyed the last DIY tutorial that we did, so we've put together another one. It's pretty simple, all you'll need are the following:


scissors, some nifty buttons, some lace, pins, a measuring tape, elastic ribbon, ribbon or yarn, fabric paint with a brush & container, and of course,
...an old sweater. We're going to start with the lace here. I didn't want it to look too new, so I diluted some fabric paint with water, and start by taking a good amount (about 1.5 - 2m) of lace and dipping it in the diluted fabric-paint.


Let it sit for a while, making sure you mix it every few minutes so that it takes the colour. If you really want it more intense, go ahead and paint the lace directly with the fabric paint, or you can even experiment with tea-dyeing (just make sure your lace is a natural fiber with the tea-dye, otherwise it won't take).
Now we move on to the sweater.


Measure how short you want to crop your sweater. Then, from the center front, cut up to the neckline.


Now you've got the basic shape. Next thing we want to do, is make it a little more fitted, so let's take some elastic and measure yourself where the sweater's hem is going to sit (on this one, it's just under the bust). Cut the elastic to your measurement.
Sew the elastic to the hem of the sweater using a wide zig-zag stitch.


Now, take your dyed/painted lace and sew it down the front seams and bottom hem of the sweater. Make sure you stretch the elastic while you're sewing the lace down or else you'll lose the stretch.
Now measure where you want your buttons and mark them with a pin.


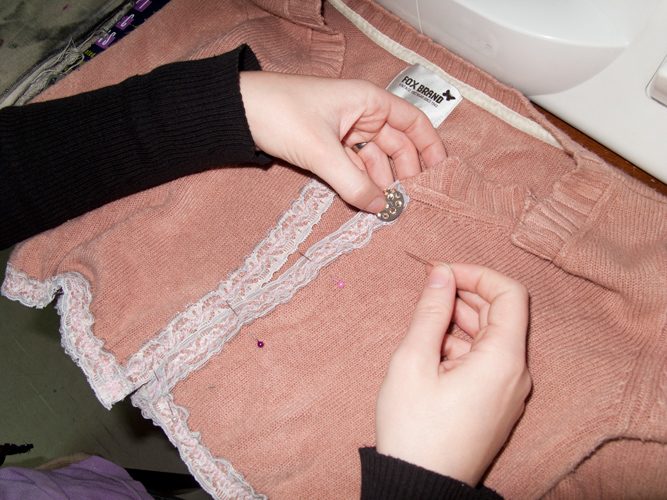
Sew down the buttons...


and mark where you're going to put the loops for buttons. You can also sew button-holes, but I liked the loops with this one. Sew everything into place.
Presto! Isn't that way more awesome than what it started out as?! You can go on to super-customize it too by adding all kinds of lace on the cuffs and pins and what not. It's also important to notice that the diluted fabric paint only give the lace a slightly darker tint, so if you really want to change the colour, I recommend dry-brushing the lace or even heavily painting it, depending on the look you want to achieve. 
I hope you've enjoyed the tutorial. We're working on our next idea, but if anyone has a request, we'd love to hear it.

<3
Andrea 

Jan 27, 2011

Rusty or Dusty?

It's been a while since we've posted any new items, so I'm really excited to show you these 2 new tops we've been working on, I'm so happy with the way they've turned out! 
 

We called them the Armour top because they remind me of body armour for some reason.
We did 2 versions, one of them in calm, office-style colours, and another in crazy rust & black. Which do you like better? If you want, you can help us decide which direction to go, check out our "Wardrobe Emergency" on Sense of Fashion!

We're also working on a similar design, but as a full dress rather than a top. You'll have to wait for that one.


<3
Andrea

Jan 23, 2011

Nightwalking

We went wandering recently around our neighborhood and beyond, through the streets of Tel Aviv.  It was a day when the streets were still covered with glistening dampness from the rain from a few hours before..  Here are the highlights:


 The Tel Aviv night


 Andrea being stylish


 Couple of cool graffitis in the streets of T.A.


Noodle looking for the waiter to order..

Jan 18, 2011

Marvelous Mondays

We don't like Mondays, and we figured that you probably don't either, right? So we've joined together with Sense Of Fashion to give you MARVELOUS Monday! We're giving away our blue vest to one lucky winner; all you need to do is visit Sense Of Fashion's Facebook Page and leave a comment for your chance to win!
Happy Monday!
<3 Andrea

Jan 11, 2011

DIY cardigan!

This DIY tutorial is about how to turn that old sweater into a chic and funky cardigan. First of all the tools you will need are:
 Once you have chosen the sweater you wish to use, lay it flat on your floor or working table, for a detailed inspection.  In this case we have an old lambswool sweater in green made by GAP
 
 We decided to break up the boring v-neck, by introducing a straight cut down the front, right hand side of the sweater.
 
 The extra fabric, past the v on the right hand side was folded over and pinned to create a geometric and asymmetrical look
 Then we folded the sleeves onto themselves 15 cm inwards.
 And for added funkiness we cut a slit up both side seams, going approximately up to the waist.
 We then pinned down some black satin ribbon onto the cuff ends of the sleeves and along the two side edges on the front.
 
 Sewing machine was then set for extreme zigzag, using black thread.
Once you've sewn the ribbon down the front & cuffs, you'll need to decide where your buttons go, and put in some button-holes


Sew on the buttons and Viola! An amazing, customized new cardigan... now that's better than a plain old Gap sweater, isn't it?!


Let us know if you like our tutorial, I think that these may be something we start doing regularly. In fact, there may even be another one next week!

<3
Andrea & Shai

Jan 4, 2011

Puzzles & Mysteries

First of all, I want to wish everyone a happy new year! Ours was a quiet one with family, a nice way to ring it in. I know you've been waiting since last year (haha) to see the new dress we've been going on about, so without further adieu, I present the new puzzle-dress!


Delectable, isn't it? I'm thinking that it would look amazing in distressed denim as well... but we'll have to see. There's a few other things on the burners at the moment.

In other news, down the street from our studio, there's been a new "redecoration" of one of the shops in the neighbourhood, and I can't quite figure it out. Here in Tel Aviv, there's a wonderfully strong street-art movement with tons of talented artists decorating the blank walls of the city. Know Hope seems to have invaded said shop, and I don't know what's going on in there now, but I want to!


 I love the warhol-inspired tinfoil curtains. My curiosity is certainly piqued! 


<3
Andrea